Hello fellow foodies, I'm sorry I have not been around much the past two months, but life has kept me away temporarily! But guess what? My computer is filled with "food" waiting to be blogged about! If only I can remember what I did exactly...hehehehe....but here is one I do remember!
This is a "NOT 4 HEALTH COOKING" as stated in the title! It is simply because it's the cutest "food thing" my hands ever made :)

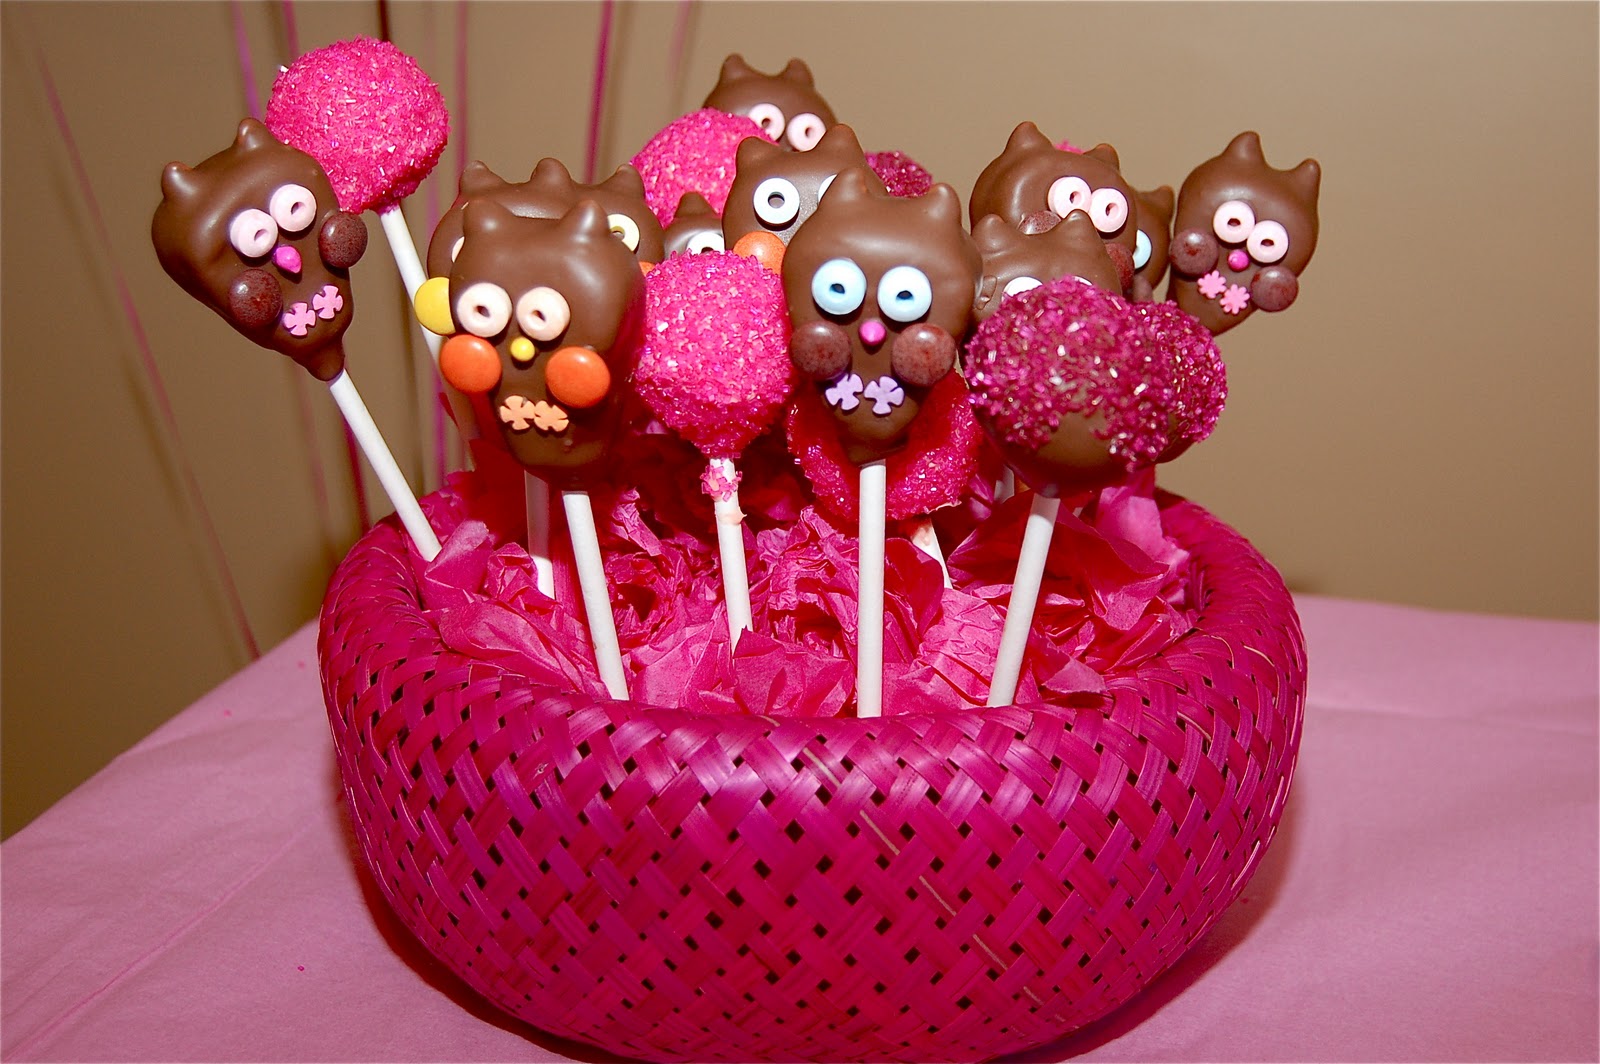
My daughter celebrated her very first birthday 11/11/11, pretty cool, eh? I chose the party theme to be the "Look Whoo's One" that features a little owl. Against all family opposition (since in Brazil "owls" are not a positive symbol, but a negative one) I stuck to the "owl" theme, since I think they are so stinking cute, and here in the US at least, they symbolize wisdom, which is something I wish upon my child all of her life!
A great part of being a parent is that you actually get to do as YOU wish fit!!! :D At least as long as you can endure peer/family pressure and disapproval, because I tell yah, they are SURE to come!!! And you thought you left that in high school, huh? OH NO...that will follow you as long as you live! It just changes the areas and the ways that it creeps in.
So here it goes, what you'll need:
- A cooked and cooled cake of your choice
- 1-2 tablespoons of frosting
- Chocolate Chips for ears
- Reese's Pieces for wings
- Candy from Candy Necklace for eyes*
- Chocolate candy melts*
- Wilton brownie-crunch rainbow chips for beak*
- Flower shaped sprinkles*
- Styrofoam board*
- Lollypop sticks*
What you'll do:
- First you'll need to crumble the cool cake. You can do that by either putting it in a food processor, or like I did, by just breaking large chunks of the cake and rubbing them against each other. I used a strawberry cake mix for the cake because of the pink color.
- Once you got the crumbled cake, you add 1-2 tablespoons of frosting and mix it with a spoon (GENTLY!) until you have the consistency of play-dough. It must stick together well and not be too dry! I used vanilla frosting.

- Once you've got the dough ready, you make them into ball shapes! Easy, easy...then just put them in the fridge for 10-15 minutes.


- Once they are ready, you get them out and shape the balls into triangles, but maintain the bottom of the triangle rounded! Loot at the picture for reference. Put them back in the fridge for 10 more minutes and get them out again! Yes...the one problem with making these pops is that it's very time consuming!
- Then you're ready for the next step. Melt the candy melts as directed, and add a little bit of candy melt onto the lollypop stick, then insert it into the "top" part of the triangle (look at the photos for reference). Then stick them into the Styrofoam board and back to the fridge-10 more minutes.
- Once time is up, get them out again, and now add the ears. Use the candy melt as your glue to stick the chocolate chips on. Back to the fridge!!! You know it...10 more minutes!
- Now you're ready to give these pops a bath! Dip them into the melted chocolate. Make sure the chocolate is well melted, and into a deep bowl. Use a spoon to cover all the areas of the pop, and then beat the stick on the side of the bowl, GENTLY please, until all the extra falls back into the bowl. Then stick it into the Styrofoam board again and BACK TO THE FRIDGE! Yep...10 minutes should do it!
- Now finally to the decorating time. You just use the melted chocolate as your glue, just like before. Then you add each part. The candy from the candy necklace for the eyes, the brownie-chips for the nose, the Reese's pieces for wings, and flower sprinkles for feet! Than before you know it, TA-DA!!! You got yourself a very adorable owl cake pop!!!


My mom made my daughter's first birthday cake, which turned out beautiful! Little one didn't have that one either since she is still growing out of some food intolerance. By next year I'm hoping to have learned some great tasting, healthy to the body, cake recipes so I can feel comfortable with her indulging in it! :) We'll see where life leads.


I had made these pops mostly for display, since they are not something I would feel comfortable feeding my 1-year old daughter, and something that didn't attract my palate! But after many guests telling me how "awesome" they tasted, I decided to give them a try. To my surprise they tasted PRETTY good!!! The strawberry cake (that I picked only because of the color) with the chocolate cover created a perfect flavor combination.
But I would still dip some real strawberries into some REAL dark chocolate instead!!
;) Cheers!
To give credit where credit is due, here is where I first came across these cutest treats: Mrs. Fox Sweets and Making Owl Pops